Insert Track Motion Points at Exact Time Separation

Phil_P wrote on 1/8/2024, 12:11 AM

Greetings,


I have been doing this manually for years and it occurs to me that there may be away to do it with scripting of some kind that would be very useful and save a lot of time.

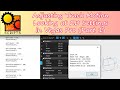
In my example screen shot you can see some track motion points. (From Left to Right)

  1. Normal - This is basically normal zoom amount
  2. Zoomed in - This is zoomed in to a certain area of the screen
  3. Zoomed in - Still zoomed in
  4. Normal - Back to normal again (Restore Box)

What I want to do is be able to set the points between 1-2 (above) and 3-4 to the exact same time (gap). So that the zooms in and back out always take place over a uniform time period. (for example, 2 seconds).

I find this tricky when working fast especially when the timeline is zoomed in or out at various levels.

So, I guess to simplify I need away to enter 2 Track Motion points at a fixed time distance apart, preferably with the 1st point being the same zoom level as the previous one.

Does anyone have any idea if this is possible?

Thank you in adance,

Phil.

Comments

jetdv wrote on 1/8/2024, 8:45 AM

Yes, this is very easy to do. See this two part series:

Those show you how to adjust the values of a keyframe. You just need to add additional keyframes at the proper locations. The location will be the "timeline" timecode to add the new keyframes. Assuming you have a video track, you can do it like this:

            VideoTrack myTrack = myVegas.Project.Tracks[0];

            TrackMotionKeyframe newKF = myTrack.TrackMotion.InsertMotionKeyframe(Timecode.FromSeconds(5));
            //set the newKF values here

You might look here as well:

https://www.vegascreativesoftware.info/us/forum/how-to-know-the-value-of-the-previous-track-motion-keyframe--144088/

jetdv wrote on 1/8/2024, 8:54 AM
            VideoTrack myTrack = (VideoTrack)myVegas.Project.Tracks[0];
            Timecode cursorLoc = myVegas.Transport.CursorPosition;

            TrackMotionKeyframe KF1 = myTrack.TrackMotion.InsertMotionKeyframe(cursorLoc);
            TrackMotionKeyframe KF2 = myTrack.TrackMotion.InsertMotionKeyframe(cursorLoc + Timecode.FromSeconds(1));
            TrackMotionKeyframe KF3 = myTrack.TrackMotion.InsertMotionKeyframe(cursorLoc + Timecode.FromSeconds(7));
            TrackMotionKeyframe KF4 = myTrack.TrackMotion.InsertMotionKeyframe(cursorLoc + Timecode.FromSeconds(8));

            //Now adjust KF2 and KF3 to the inner positions. KF1 and KF4 should be fine with no changes

@Phil_P This would add a keyframe at the cursor location, a second keyframe 1 second later, a third keyframe 7 seconds after the cursor, and a fourth keyframe 8 seconds after the cursor.

All of the keyframe will be the same at that point. You should not have to do anything to KF1 and KF4 as you want them to remain at the original values. However, you'll then need to change KF2 and KF3 to the new "inner" position you're wanting. And you'll need to change the added timecodes to be the distances you really want to use.

Phil_P wrote on 1/8/2024, 11:15 AM

Thanks @jetdv I will go through the tutorials again and try and put this together. This is very kind of you.

By the way, my long-winded description is overly complex.

I don't need 4 keyframes, it is actually only 2.

It is basically this:

I will place cursor where I am editing.

  1. Find value of previous track motion keyframe - the last one before the cursor. (I Suspect this may cause me problems as I don't see that in any tutorial).
  2. Add new keyframe with that found value at cursor.
  3. Add new keyframe with any value (as I will manually edit the zoom and movement factor) at the set number of seconds after.

Basically, what this will do is in step 1, get the previous values so that the new keyframe added in step 2, will stop the previous values changing until step 3. which will be my zoom in point.

Then when I am ready, I will simply repeat the script. Sometimes the track motion will be different zoom levels OR back to normal, so no need to add settings for that. The important thing is to have uniform time distance between the keyframes added at step 2 and 3.

That is it.

I will post back if I get it working.

Thanks again. :-)

Phil_P wrote on 1/10/2024, 5:41 AM

OK I have managed to do 2 scripts that do almost what I want. (I did this all in Notepad++ with some assistance from Chat GPT):

The first one will add 2 keyframes, 1.5 seconds apart. The keyframes are the same as the previous one. It will also put the cursor over the second one. (The reason for this is explained later.)

The second one will add 2 keyframes, 1.5 seconds apart. The first one is the same as the previous one and the second one is 0,0 3840,2160 so basically the same as "Reset Box" on my 4K settings.
 

using System;
using ScriptPortal.Vegas;
using System.Windows.Forms;

public class EntryPoint
{
    public void FromVegas(Vegas vegas)
    {
        // Check if there is at least one video track in the project
        if (vegas.Project.Tracks.Count > 0)
        {
            // Get the first video track in the project
            VideoTrack videoTrack = vegas.Project.Tracks[0] as VideoTrack;

            // Get the cursor position in the timeline
            Timecode cursorPosition = vegas.Transport.CursorPosition;

            // Insert Track Motion keyframe at the current cursor position
            TrackMotionKeyframe newKeyframe = videoTrack.TrackMotion.InsertMotionKeyframe(cursorPosition);

            // Get the position of the previous keyframe
            double prevWidth = 0;
            double prevHeight = 0;
            double prevPosX = 0;
            double prevPosY = 0;

            foreach (TrackMotionKeyframe tmKF in videoTrack.TrackMotion.MotionKeyframes)
            {
                if (tmKF.Position < cursorPosition)
                {
                    prevWidth = tmKF.Width;
                    prevHeight = tmKF.Height;
                    prevPosX = tmKF.PositionX;
                    prevPosY = tmKF.PositionY;
                }
                else
                {
                    // Break out of the loop once you find the previous keyframe
                    break;
                }
            }

            // Set X and Y position, width, and height of the first keyframe to the values of the previous keyframe
            newKeyframe.PositionX = prevPosX;
            newKeyframe.PositionY = prevPosY;
            newKeyframe.Width = prevWidth;
            newKeyframe.Height = prevHeight;

            // Adjust cursor position by adding 2 seconds
            Timecode newPosition = cursorPosition + Timecode.FromSeconds(1.5);

            // Insert another Track Motion keyframe 2 seconds later
            TrackMotionKeyframe newKeyframeLater = videoTrack.TrackMotion.InsertMotionKeyframe(newPosition);

            // Move the cursor to the position of the second keyframe
            vegas.Transport.CursorPosition = newKeyframeLater.Position;

            // MessageBox.Show("Track Motion keyframes added at the cursor position and 1.5 seconds later on the selected video track. The values of the first keyframe are set to the values of the previous keyframe: Width: " + prevWidth + ", Height: " + prevHeight + ".\n\nThe cursor is now positioned at the second keyframe.", "Result", MessageBoxButtons.OK, MessageBoxIcon.Information);
        }
        else
        {
            MessageBox.Show("There are no video tracks in the project.", "Error", MessageBoxButtons.OK, MessageBoxIcon.Exclamation);
        }
    }
}
using System;
using ScriptPortal.Vegas;
using System.Windows.Forms;

public class EntryPoint
{
    public void FromVegas(Vegas vegas)
    {
        // Check if there is at least one video track in the project
        if (vegas.Project.Tracks.Count > 0)
        {
            // Get the first video track in the project
            VideoTrack videoTrack = vegas.Project.Tracks[0] as VideoTrack;

            // Get the cursor position in the timeline
            Timecode cursorPosition = vegas.Transport.CursorPosition;

            // Insert Track Motion keyframe at the current cursor position
            TrackMotionKeyframe newKeyframe = videoTrack.TrackMotion.InsertMotionKeyframe(cursorPosition);

            // Get the position of the previous keyframe
            double prevWidth = 0;
            double prevHeight = 0;
            double prevPosX = 0;
            double prevPosY = 0;

            foreach (TrackMotionKeyframe tmKF in videoTrack.TrackMotion.MotionKeyframes)
            {
                if (tmKF.Position < cursorPosition)
                {
                    prevWidth = tmKF.Width;
                    prevHeight = tmKF.Height;
                    prevPosX = tmKF.PositionX;
                    prevPosY = tmKF.PositionY;
                }
                else
                {
                    // Break out of the loop once you find the previous keyframe
                    break;
                }
            }

            // Set X and Y position, width, and height of the first keyframe to the values of the previous keyframe
            newKeyframe.PositionX = prevPosX;
            newKeyframe.PositionY = prevPosY;
            newKeyframe.Width = prevWidth;
            newKeyframe.Height = prevHeight;

            // Adjust cursor position by adding 2 seconds
            Timecode newPosition = cursorPosition + Timecode.FromSeconds(1.5);

            // Insert another Track Motion keyframe 2 seconds later
            TrackMotionKeyframe newKeyframeLater = videoTrack.TrackMotion.InsertMotionKeyframe(newPosition);

            // Set X and Y position, width, and height of the second keyframe
            newKeyframeLater.PositionX = 0;
            newKeyframeLater.PositionY = 0;
            newKeyframeLater.Width = 3840;
            newKeyframeLater.Height = 2160;

            // Move the cursor to the position of the second keyframe
            vegas.Transport.CursorPosition = newKeyframeLater.Position;

            // MessageBox.Show("Track Motion keyframes added at the cursor position and 1.5 seconds later on the selected video track. The values of the first keyframe are set to the values of the previous keyframe: Width: " + prevWidth + ", Height: " + prevHeight + ".\n\nThe values of the second keyframe are set to X: 0, Y: 0, Width: 3840, Height: 2160. The cursor is now positioned at the second keyframe.", "Result", MessageBoxButtons.OK, MessageBoxIcon.Information);
        }
        else
        {
            MessageBox.Show("There are no video tracks in the project.", "Error", MessageBoxButtons.OK, MessageBoxIcon.Exclamation);
        }
    }
}


Phil_P wrote on 1/10/2024, 5:46 AM

So, this works fine for me, the first script adds the keyframes at the set width and gets the previous value etc. So, this is for me to edit the second keyframe. the second one resets the box so no need to edit anything.

I spent far too long on this trying to get the following 3 things working and failed miserably:

  • Work on Selected Video track only (at the moment it works on the first video track).
  • Popup Dialogue asking for the user's required duration between the keyframes (defaulting to 1.5 seconds)
  • Automatically open the key frame editor dialogue after creation and selection of the second key frame
  • Get the default video size so that it is more user friendly for users not using 4K.

I think these are beyond my understanding of this type of code.

Thanks again for your tutorial and tips @jetdv

If you can guide me on any of the above I might be able to finish it off.

And of course, anyone is welcome to use these.

:-)

jetdv wrote on 1/10/2024, 6:28 AM

@Phil_P, you don't need two scripts to do this unless you don't know the distance to the third keyframe without moving the mouse. Plus, if you add all four at once, you only need to modify keyframes 2 and 3 as 4 will already be the same as 1. As for your comments:

1. Do this:

            foreach (Track myTrack in myVegas.Project.Tracks)
            {
                if (myTrack.Selected && myTrack.IsVideo())
                {
                    //do your stuff here
                }
            }

2. See here:

3. A script can open the "effect" dialog but I'm not seeing a way to open the Track Motion dialog.

4. Media Properties:

Project Properties:

Phil_P wrote on 1/10/2024, 7:06 AM

Hi @jetdv I need 2 scripts because this is for editing purposes. So as an example, I reach a point in my edit where need to zoom (and move) track motion to show a highlight on the screen, could be any random amount of zoom and movement, say for example you want to show an element at the bottom right of your screen zoomed in.

Actually, you will understand this, as you have to do it in your tutorials, when you are zoomed in on thr "form" for example.

We will never know, how long we will need to keep viewing that zoomed in part of the video. There is no fixed time.

But after some (unknown) time, we will then want to either add another zoom / move to another area, (using the same 1st script) OR I will want to reset the box, this is what the 2nd script does.

So now I have a uniform time pf 1.5 seconds from the start to the finish of the zoom movement, no matter how much the timeline is zoomed in.

So basically, each pair of track motion key frames, either zoom/moves at random places deponing on my edit. Imagine you are doing a tutorial on your code for example, and you want to really zoom in to a particular area while you talk about it.

I have been doing this kind of editing a long time but always been frustrated by not being able to gauge the distance of key frames (quickly), when the timeline might be zoomed differently. And sometimes I would add the new zoom value forgetting to add a keyframe at the old value first.

Thanks for the tips "(myTrack.Selected && myTrack.IsVideo())" I will try and get that one in.

I am guessing that I cannot do the Ask user for Input Box idea without help from Visual Basic. I will try to find more info from your very helpful tutorials.

Thank again.

Phil_P wrote on 1/11/2024, 12:02 AM

Another question: (Still failing on all of the above but will keep working on it). I am trying to set the keyframe type to smooth:

newKeyframe.PositionX = prevPosX;
newKeyframe.PositionY = prevPosY;
newKeyframe.Width = prevWidth;
newKeyframe.Height = prevHeight;
newKeyframe.VideoKeyframeType = Smooth;

But it is just throwing errors at me. I have tried various permutations of "VideoKeyframeType.Smooth"

I cannot find any examples of exactly how to use this command.

Does anyone know if the VideoKeyframeType.Smooth is working?

jetdv wrote on 1/11/2024, 6:44 AM

newKeyframe.Type = VideoKeyframeType.Smooth;

Phil_P wrote on 1/11/2024, 11:22 PM

newKeyframe.Type = VideoKeyframeType.Smooth;

Thank you so much! I spent hours on this. (I am not a c# programmer at all, but I do code in other languages, so my logic is quite good). So, I am slowly figuring out how it is all put together. The API is very basic reference but there are no really good examples. Apart from your tutorials of course.

Highly appreciated thanks again.

jetdv wrote on 1/12/2024, 7:31 AM

@Phil_P, if you'll use Visual Studio, it provides "code completion" which simplifies things. You just press "." and it will give you a list of possibilities for you to choose from.

Phil_P wrote on 1/13/2024, 12:42 AM

Hi @jetdv yes you are right of course. I did use VS a while ago as I started learning c# but I got busy with other things and have pretty much forgotten everything I knew. I had already downloaded it again but not installed yet.

I love to improve the speed of tasks that I have to do often by using types of automation. I have been writing scripts of various kinds for many years (some of them are many thousands of lines) but using a proprietary language for the software framework I use. It is line based though, so object-based stuff is a challenge for me for sure.

Thank again, it is really good to know that you are around. I am looking fwd to installed VS again and having some new challenges. :-)

Phil_P wrote on 1/13/2024, 1:36 AM

If anyone wants the finished script, it is on my Gumroad, (free):

https://everythingcreative.gumroad.com/l/zwjvi

I will make a video on the usage as soon as time permits. :-) I will also be working to improve the functions.

Phil_P wrote on 1/15/2024, 8:06 AM

I have updated this again. Decided that only 3 scripts (for timings) were required, as the reset version can just be used every time.

It now also resets to the project default resolution, (instead of only 4K).

I am struggling with the form to set the timings, (hence 3 separate scripts for different timings). I think my version (Visual Studio 2022), is quite different to the one used in the tutorials. But will work on it.

jetdv wrote on 1/15/2024, 10:38 AM

Yes it is. You really have to search for the correct preset or just download the blank project in the description of the tutorial and you'll be set.

Phil_P wrote on 1/17/2024, 12:47 AM

Ok I have completed the script(s). Thank you for your assistance @jetdv :-)

I decided not to bother with the settings dialog, as it was beating me and when I thought more about it, it made no sense as it would slow down the interaction, and after all, the whole point of this was to save time.

So, instead I added a "settings.txt" file in the script directory, which enables users to change the timings and key frame type for each of the 3 scripts.

Details below:


These 3 scripts will add 2 keyframes on a track motion track at an exact distance apart. So that you don't have to guess how far apart your track motion moves and zooms are when working quickly at various timeline zooms.

It will add 2 key frames, the first one will be the same value as the previous key frame and the second one will be a reset to your project resolution (reset box).

There are 3 versions of the script for different timings:

Short / Def / Long

You can edit the timing and type in the settings.txt file. This file MUST be in the same folder as the script dll files:

Shorttime=0.75
Mediumtime=1.5
Longtime=3.5
Shorttype=Fast
Mediumtype=Smooth
Longtype=Smooth

Choices for timing are any number (in seconds)

Choices for Type are:

Sharp
Slow
Hold
Linear
Fast
Smooth

Usage:

Copy the entire Phil P Keyframes folder to the folder:

YourUserName\Documents\Vegas Script Menu

(If this folder does not exist you can create it).

Open Vegas and go to Menu > Tools > Rescan Script Menu Folder

  • You can then either run the scripts from the menu or add them to a shortcut (Otter Bar is great for this)
  • Add a set of keyframes using one of the scripts and edit the second keyframe in Vegas to your required value.
  • Add another set of keyframes to reset width and height etc. back to normal values. (Or adjust the second keyframe to your new values).


I will be working to improve this script over time.

If anyone would like to see the source code, I am happy to share it.

Also, I understand that this whole thing probably does not make immediate sense as to why I wanted to do it. I will make little video soon.
 

Phil_P wrote on 1/17/2024, 1:37 AM

Very rough video showing it in action, using the Happy Otter Toolbar. I should really have used my own tool to do some more detailed zooming, haha, but out of time for today. :-)

Also, there are a couple of stutters during the zooms, this was a 4K recording and first run. Obviously, these do not appear in the render.

Phil_P wrote on 1/20/2024, 3:26 AM

Just made a minor update to this:

The keyframes will be added on the selected video track. If there is no video track selected, the keyframes will be added to the first video track.
 

Cheers, P.

Phil_P wrote on 2/6/2024, 2:00 PM

Another update to this, (I think this will be the last for now).

Adding a dialog that can be run to alter the settings. Scripts now work with all Source Keyframe types.

https://everythingcreative.gumroad.com/l/zwjvi


iEmby wrote on 2/16/2024, 4:04 AM

What about pan&crop tool keyframes or eny event fx keyframe movements.

i want to just move last key frame of multiple selected events to the end timecode event.?

is that possible or just for trackmotion?


PROCESSOR
     

Operating System: Windows 11 Pro 64-bit (Always Updated)
System Manufacturer: ASUS
12th Gen Intel(R) Core(TM) i7-12700 (20 CPUs), ~2.1GHz - 4.90GHz
Memory: 32GB RAM
Page File: 11134MB used, 7934MB Available
DirectX Version: DirectX 12

-----------------------------------------------

MOTHERBOARD


ASUS PRIME H610-CS D4
Intel® H610 (LGA 1700)
Ready for 12th Gen Intel® Processors
Micro-ATX Motherboard with DDR4
Realtek 1 Gb Ethernet
PCH Heatsink
PCIe 4.0 | M.2 slot (32Gbps) 
HDMI® | D-Sub | USB 3.2 Gen 1 ports
SATA 6 Gbps | COM header
LPT header | TPM header
Luminous Anti-Moisture Coating
5X Protection III
(Multiple Hardware Safeguards
For all-round protection)

-----------------------------------------------
EXTERNAL GRAPHIC CARD

-----------------------------------------------

INTERNAL GRAPHIC CARD (iGPU)

------------------------------------------------

LED - MONITOR

Monitor Name: Generic PnP Monitor
Monitor Model: HP 22es
Monitor Id: HWP331B
Native Mode: 1920 x 1080(p) (60.000Hz)
Output Type: HDMI

-----------------------------------------------

STORAGE DRIVE

Drive: C:
Free Space: 182.3 GB
Total Space: 253.9 GB
File System: NTFS
Model: WD Blue SN570 1TB (NVMe)

---------------O----------------

My System Info (PDF File).

https://drive.google.com/open?id=1-eoLmuXzshTRH_8RunAYAuNocKpiLoiV&usp=drive_fs


Also Check

VEGAS Pro Vault Blogger Created By Me.

https://vegasprofreetools.blogspot.com

My YouTube Channel Dedicated to Only VEGAS Pro Tutorials

http://www.youtube.com/@editroom1580