OT: Polavision -- Final Chapter

johnmeyer wrote on 11/3/2009, 8:52 AM
[Edit]Look at my November 6, 2009 post in this thread for the final chapter on what I ended up doing.

I am about to receive three 50' rolls of Polavision film for transfer to video. I have done my homework in the Super8 film forums, but I thought I'd ask here if anyone has ever seen this format or attempted to transfer it. For those not familiar, this was Polaroid's instant movie film, introduced in the late 1970s. You took the film, and then re-wound it. The act of rewinding opened the developing chemicals and within one minute, it was ready to show.

The players are almost impossible to find, and even if I could find one, they had a hot spot that was even worse than most film projectors, so a simple transfer by pointing the camera at the box would not work well. Fortunately, one can apparently break open the sealed canisters, take out the film, and then play it on any Super8 projector, in this case, my Workprinter. My main concern, and reason for posting, is to find out if there is any problem handling the film, and whether I can clean it using the standard cleaning procedures. I am prepared for some pretty ugly looking stuff, based on what I see here:


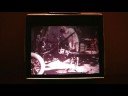
The stuff is apparently denser than even Kodachrome. So, I thought I might try capturing twice: once exposing for the highlights, and a second time opened up +3 stops or more to totally blow out the highlights and then expose for the shadows. If the registration holds well enough between captures, my idea would be to use the blown out version on the top track and create some sort of masking so that the properly exposed highlights from the bottom track show through the blown out sections of the upper track (sort of a manual attempt at HDR). I have to figure out how to have this mask "feather" so that I blend a little of the upper track down to a certain luma value. I think I can do this in Vegas because I did something with luma masking back when Chaboud (Sony developer) posted his "two cats" demo.

So if anyone has ideas about Polavision, I'm all ears.

Comments

RalphM wrote on 11/3/2009, 9:09 AM
John,

I've never heard of this - had no idea it existed.
Have you tried asking at http://www.urbanskifilms.com ?

He may answer you if he's not too busy...

I've seen one or two S8 films in a cassette, but that iwas straignt Kodachrome. I'd be interested to hear the outcome of your efforts.

The image may look better when run on your Workprinter, but this sounds like a lot or work.

Ralph
JackW wrote on 11/3/2009, 10:34 AM
John: The hot spot you mention may be owing to a lack of a diffusion media between the lamp and the lens in the Polavision projector. Our film technician compensated for this omission in another projector by rear projecting and shooting the rear projection screen. Not tidy, but it worked.

I like your idea of two exposures. Let us know how it turns out, please.

Jack
farss wrote on 11/3/2009, 1:11 PM
I'm impressed that film developed in this way has survived. Compared to the amount of effort that goes into fixing and rinsing neg a quick pass through some goo must have left something active behind.
A good rinse with distilled water should do no harm to the film, ultrasonic cleaning might help.

Doing two passes should be possible. I believe there's software around that'll reregister the images. Last week I had a discussion with a gent who sells cameras for astronomy. One technique commonly used is to use a camera with no internal filters. A filter wheel is then used to take multiple B&W images at different parts of the spectrum and from that a true or false color image is created. Apparently getting each image to align is done very easily these days.

Regarding getting as much image out of the film. It's been my experience that 10bit 4:2:2 is much easier to grade than 8bit 4:2:0 be it from a camera or a film scan. The EX cameras with their cine gamma curves would be interesting to try out with a film scanner. Those gamma curves go to 400% to preserve some highlight detail although color banding can be an issue.

Bob.
Jay Gladwell wrote on 11/3/2009, 1:48 PM

I remember seeing this gimick years ago, but I haven't seen any finished footage.

If the film has been stored in the original cassettes, I can't image it would need cleaning (and I my be very mistaken). If it were me, I would select a head or tail section without any proper image and test clean that.

Eastman makes, or used to, some cleaners specifically for cleaning motion picture film in machines. Not sure if you can get it today. They also used to make a cleaner for film negatives.

But this may prove to be a different animal. Any cleaner you put on it may have an adverse reaction to the dried chemicals used in the original development process.

Proceed with caution (I know you know that).


johnmeyer wrote on 11/3/2009, 1:50 PM
Thanks Ralph and Jack. I actually may need some supplies so I'll contact that supplier in FL that Ralph mentioned. Since I don't have any access to a Polavision viewer, the hot spot is something I won't have to deal with. I only mentioned it because initially no one (including me) wants to break open the sealed cassette, and so just videotaping the Polavision screen is the only thing that works with the intact cartridge.

Bob, I'm glad you responded. You've given me several useful things to think about. First of all, I never would have thought of using ultrasonics to clean film. I have a commercial-grade, although fairly small, ultrasonic cleaner. Have you done ultrasonic cleaning of film? Does it do a better job than cotton cloth and film cleaner? I like the idea because I have never been happy with the results of my film cleaning.

The only issue with any cleaning of this particular stuff is that apparently there are three distinct layers of emulsion. That by itself is not unusual, but several things I have read indicate that the bonding between layers may not be particularly good because the chemicals had to reach all layers and be finished within seconds. That was one reason I was asking if anyone had experience in handling the stuff. .

As for software to register the images, I can go looking for that, but have you actually used something that you can recommend? I actually might have other uses for something like that. The gate on the Workprinter has been removed, so the captured video "sees" the edges and the sprockets, and therefore I would actually have something for alignment software to grab onto.

The multiple B&W captures with the color wheel sounds like Technicolor. I am not sure how it might help me with this project. Obviously the color of my captures -- never one of the strengths of Poloaroid instant photos -- is going to be horrible. However, that is the least of my worries. The big issue is the first one you mentioned: the chemical residue and lack of proper fixing. Apparently most of the Polovision film that survives is usually marked with what looks like large mold spots, but which are probably chemical stains of some sort.

I think I may sacrifice a foot or so of the stuff to the ultrasonic tank after I've done an initial capture. Thanks so much for that idea. I may also try that on the 1929 Cubs World Series film that has generated so much interest the past few years. I have retrieved that from the client to try to re-capture in HD. My only problem with that project is that I think I am going to have to capture direct to HD via the RGB output of my FX1 in order to avoid the interframe compression of HDV.

But, that's a whole 'nother project for next week. I think I'll have to find and buy a cheap RGB HD capture card, if there is such a thing. I have not paid much attention to this over the years.

Oh, and the 4:2:2 vs. 4:2:0 stuff is definitely over the top for this project. It would be like trying to make prints from some of the miniature Kodak formats (110, disc film, etc.) and then worry about the sharpness of a condenser enlarger vs. a diffuser: the difference would be totally lost given what is being projected.
johnmeyer wrote on 11/3/2009, 1:53 PM
Jay,

Any cleaner you put on it may have an adverse reaction to the dried chemicals used in the original development process.I was posting when you wrote that. And yes, that is exactly my biggest fear. As for head/tail, I am expecting to have about two inches of each. Since this was a cartridge that was never opened, I expect to find a leader that goes from the hub to the opening, but nothing beyond that. I am hoping that perhaps there is some footage that is screwed up (wrong exposure, etc.) somewhere in the three reels, and I can experiment with that.
farss wrote on 11/3/2009, 5:39 PM
"Have you done ultrasonic cleaning of film?"

No!
I've heard of it being done but like you I would be concerned about it unsticking something that you wouldn't want coming unstuck.


Bob.
johnmeyer wrote on 11/3/2009, 6:04 PM
I've heard of it being done but like you I would be concerned about it unsticking something that you wouldn't want coming unstuck.I just did some quick searching. I think I'll skip the ultrasonic cleaning. Quite a few labs do offer the service, but in looking at the posts at filmshooting.com, everyone says to NOT use water because it might swell the emulsion. What they do say to use are things like perc, and the usual isopropyl alcohol. I have used both on a cotton cloth to rub off the dirt, but I wouldn't want to get in the same room with an ultrasonic tank full of perc, buzzing away. I'd be concerned in either case with the flammability.

Having said all that, I still might try this on some old 35mm B&W still photo negatives that I transferred years ago, but which had been in a flood back in the 1940s and subjected to sewer water. There was "stuff" stuck onto the emulsion. The ultrasonic might just free that up.
Opampman wrote on 11/4/2009, 7:10 AM
John - I use to own a film laboratory and we used ultrasonic cleaning on everything. The cleaning solution was some form of perc with a proprietery name but it did an excellent job. The film handling portion of the machine was fairly complex so without a specific machine, I'm not sure I would try it if I were you. One place you might check out is http://www.filmtech.com/. They have a really good reputation and, while I haven't talked to him in years, the owner, Ralph Sargent, is a brilliant man and probably knows more about film restoration than anyone you can find. I'm sure they'll want to sell their services but you may get someone there to at least give you a tip or two. Just a long shot but it might be worth a phone call.
johnmeyer wrote on 11/4/2009, 8:04 AM
I use to own a film laboratory and we used ultrasonic cleaning on everything. The cleaning solution was some form of perc with a proprietary name but it did an excellent job.The film is due in later today or sometime tomorrow. I'll know soon how bad it is. I have both Perc and also some Pec pads, and also some Kodak material made specifically for film cleaning. I'll try those first.

Thanks for confirming that labs do indeed use ultrasonic cleaners. That's what I read yesterday after Bob posted about it, but I wasn't sure. I think I've been on the filmtech site a few times, and I'll contact Ralph if I get stuck.
Opampman wrote on 11/4/2009, 8:25 AM
John - Ultrasonic is definitely the way to go. I was in college at the University of North Carolina and worked with Ralph in the audio recording laboratory, but it was so long ago, I doubt he'll remember me. You may want to start with their sales people first and see what you can get out of them if you call filmtech.
johnmeyer wrote on 11/4/2009, 11:58 PM
The film arrived. I pulled the film out of each cassette, wound it onto some old 50' reels, added some leader, and captured. There is actually only 38.5 feet of film in each cassette, so the capture goes quickly.

The film is exactly as I anticipated: dense, grainy, and full of chemical spots. There is actually virtually no dirt on the film itself. Some of the film has vertical lines on every frame. These are not scratches, but apparently have something to do with how the three color layers align (actually, how they don't align). I was easily able to eliminate these on a still image, so hopefully I can just apply Gaussian Blur or something similar in Vegas. As a fallback, I can always export the video as individual images, and then batch process them in my photo editor. I've done this before for special effects (turning video into pen drawings), but it should work for restoration as well.

I doubt very much I'll be able to do anything about these spots, but tomorrow I'll spend a little time, just to see what happens.

I did try capturing two of the reels twice: once letting the highlights blow out, and once with the "spotlight" feature enabled on my camera. This keeps the highlights out of 100+ zebra. I lined the two captures up on the Vegas timeline, and they match perfectly, frame-for-frame, for the entire length of the capture. The Workprinter does good things.

Tomorrow, when my head is clear, I am going to try to figure out how to create an HDR image from these two captures. The idea is to somehow use the bright capture with the blown-out highlights as both the main video, but also as a mask. The mask will be based on luma values, and will let through the darker image below, but only when luma exceeds a very bright threshold. If I can get that to work, the challenge will then be to try to figure out how to "feather" the result so I don't end up with harsh transitions between the normal footage and the darker version.

Should be fun.

BTW, here's a very small portion of one frame, showing the vertical lines:


apit34356 wrote on 11/5/2009, 1:36 AM
usually 3 ranges of exposed luma produce good HDR workprint but there is a lot of techniques on the web.

Vegas is limited but try multi copies on multi tracks of the over exposed film where each track has an unique limited clipped luma range,( permitting fine tuning)------- like photoshop layers.

"how the three color layers align ", mmmmm, very interesting, sounds like a grating effect on the lens inside surface in the camera. Since their evenly spaced, it appears, its an engineered effect---good or bad. Since most of these cameras had very poor lens, this maybe a by product or a design effect to be different-ie. tv like image.

Good luck, sounds like a good challenge, but as usual, you'll kick it's butt! ;-)
Opampman wrote on 11/5/2009, 8:59 AM
here's a very small portion of one frame, showing the vertical lines:
____________________________________________________

John - Since the Polavision was basically a B&W film with three filter layers, is this some type of lenticular screen? That's what it looks like to me.
Tim L wrote on 11/5/2009, 10:28 AM
From some casual reading on the internet, I get the impression that Polavision film is not made up of 3 layers, but rather is a single b&w film base with a single filter layer on top of it that has side-by-side stripes of Red, Green, and Blue filters -- like pixels on a Sony Trinitron.

http://blogs.law.harvard.edu/hfacollections/2009/06/30/polavision-polaroids-instant-home-movies/

Perhaps these are the lines you are seeing in the scan? (Or perhaps I've misunderstood along the way...)

Tim L
johnmeyer wrote on 11/5/2009, 11:15 AM
Thanks for the links to the Poloavision archive at Harvard. Polaroid Land used to have their headquarters just up Memorial Drive from Harvard, near M.I.T., so it's not surprising Harvard would have some info.

I think all of you are correct about the strips being like a lenticular lens or like a Trinitron. I can get them to disappear during transfer if I defocus slightly. However, I get the impression that they disappear, not because the blur is "mushing" the lines, but because the focal plane has moved slightly. Subtle difference. However, since I want sharpness, I'm going to capture with the lines intact and remove them in post. I've already developed a procedure for that.

Finally, about two minutes ago, I got Vegas HDR working.

THANK YOU TO THE ORIGINAL SONIC FOUNDRY VEGAS DEVELOPMENT TEAM!!

It is amazing what power lies hidden in the controls in Vegas.

Since I don't do masking and compositing very often, I have to re-learn everything each time. It actually is quite simple (once I spent an hour to figure it out ...). For anyone who wants to take the highlights from one capture and combine them with the shadows in another capture taken at a different exposure, here’s the technique:

1. Put the bright, over-exposed capture on the top track. Set that track to parent.

2. Put a Mask fX on this top track (or put it on the event: it doesn't matter).

3. Set the compositing mode of this first track to Multiply (Mask).

4. Create a second track and make it a child to the first track. Put the darker capture on this track, and line it up so the frames match with the first capture.

5. Put the brighter capture once again on the third track. This track should NOT be a child, but should be a "regular" track.

The only thing left is to play around with the mask controls on the fX on the first track. You set the mask to Luminance. Leave the bottom two sliders alone. Then, move the first two sliders around until you get just the highlights from the darker capture, but all the midtones and shadows from the brighter capture.

Voilà!

The result looks really good, much better than I had hoped for.

Now onto the dirt problem.

Oh, the client just found an audio tape of someone singing during the service (oh no, it's Stuckey's "Wedding Song," but OK, it was a 1978 wedding ...). So, I now have an audio track.

One other thing: the motion seems really fast at 18 fps. The literature says this was 18 fps, but since there is only 38.5 feet in the cartridge instead of the normal Super8 50 feet, do you suppose that Polaroid slowed down the film to get the same amount of time that people were used to with the existing film technology??

One more thing to think about ... I sure love these puzzles.


Opampman wrote on 11/5/2009, 11:41 AM
John - I would be surprised if it was 18 frames per second. Much of the stuff from that era was actually 16 fps - supposedly - but I found (when I had the motion picture lab) that 14 fps was more the norm. I'd slow it down to about 85-88% of the speed and see what you get.

Kent
amendegw wrote on 11/5/2009, 11:50 AM
John,

I've been following this thread with much interest. I wish I had enough knowledge to offer some helpful advice.

When you get done with this project, could you post a few seconds of before and after footage? I'd love to see the results of your efforts.

...Jerry

System Model:     Alienware M18 R1
System:           Windows 11 Pro
Processor:        13th Gen Intel(R) Core(TM) i9-13980HX, 2200 Mhz, 24 Core(s), 32 Logical Processor(s)

Installed Memory: 64.0 GB
Display Adapter:  NVIDIA GeForce RTX 4090 Laptop GPU (16GB), Nvidia Studio Driver 566.14 Nov 2024
Overclock Off

Display:          1920x1200 240 hertz
Storage (8TB Total):
    OS Drive:       NVMe KIOXIA 4096GB
        Data Drive:     NVMe Samsung SSD 990 PRO 4TB
        Data Drive:     Glyph Blackbox Pro 14TB

Vegas Pro 22 Build 239

Cameras:
Canon R5 Mark II
Canon R3
Sony A9

RalphM wrote on 11/5/2009, 1:13 PM
John,
Have you checked to see if the feed holes are identical to S8 spacing? Given that the Workprinter is a sprocketless design, it could pull through a differently spaced feed hole successfully.

Ralph
johnmeyer wrote on 11/5/2009, 11:31 PM
Have you checked to see if the feed holes are identical to S8 spacing?Yeah, they are definitely S8. I have two different splicers, a beautiful German made splicer from the early 1960s and a cheap one for tape splices. The film fits into the splicer sprocket holes perfectly.

My problem for tomorrow is cleaning. I took a few inches and tried isopropyl alcohol; Perc; and an Edwall film cleaning solution. They all seemed to work without damaging the film. I then tried ultrasonic, using distilled water, and the emulsion was totally gone in five seconds. So, as I suspected, this is strange stuff, and I am now spooked about using any solution on it for fear that it might do damage that might not show up right away. I think I may just go with the captures I already have, figure out a way to remove some of the dirt digitally, and leave it at that.

As I've said before, when doing restoration, the Hippocratic Oath applies: First, do no harm.

If anyone has experience as to which of the three cleaning solutions would likely be the safest, I'd sure be interested.
apit34356 wrote on 11/5/2009, 11:54 PM
"using distilled water, and the emulsion was totally gone in five seconds" not surprise, distilled water has too many free ions, liquid H2O has more H HO ions than people think, this is why H2O is great at "dissolving" compounds. Sounds like there's no protective coating on the film.
Opampman wrote on 11/6/2009, 6:39 AM
"If anyone has experience as to which of the three cleaning solutions would likely be the safest, I'd sure be interested."

John - not sure which I'd use but definitely not water in any shape or form - as you have already seen. Water is any film emulsions worst enemy.

Kent
apit34356 wrote on 11/6/2009, 7:27 AM
isopropyl alcohol is probably the safest for your health and can be easily diluted to different concentrations using distilled water. If you have a vented hood to work under then Perc is an option. I have no experience with this Polavision film, so no real data that I can stated. But I,we, have touched up IC manufacturing negatives using all the above and other solutions in the past. Plus we used pressured filtered air with a H2O mis t(cheap alternate, not advice unless tested) to wash off the cleaning chemicals in the old days. ;-) IC negatives are massive compare to 8mm but not in length, so I'm thinking a process of trays( different concentrations levels) similar used in development of 35mm may be done with a little mechanical engineering and could ensure uniform cleaning------- but this may be overkill. ;-)

To test different concentrations, use an eyedropper to drop different concentrations on one frame for easy comparison of reactions. Use a magnifying glass to observe reactions; use low light, absolutely avoid any UV light. If you are going to test the ultrasonic with above solutions, set it at it's lowest power level first. Avoid breathing any fumes, period, no smoking ;-). I figure you know this, but its a safety warning for those are new to these procedures.
johnmeyer wrote on 11/6/2009, 8:54 AM
Thanks for the advice. I guess alcohol is probably the way I'll go (plus, I have a LOT of it). I still may not be brave enough to clean this stuff. While it has an acetate base, everything else about its construction and chemistry is unusual. Even though they will probably never again project it, I sure don't want to ruin it.